
Refinished Kitchen Table
Let’s just start with it right away. Here’s the before and after of our table:
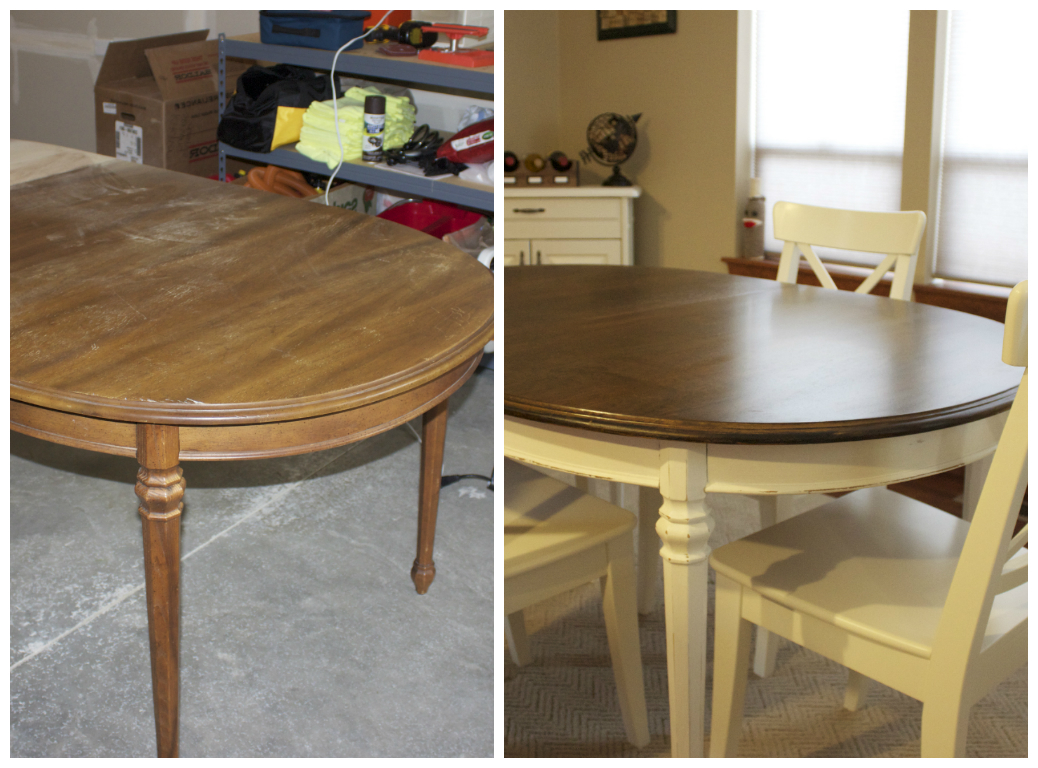
We have been borrowing a kitchen table for the past year and a half. Over that time we’ve looked everywhere for a table we like. We found some that would do, but all of the tables seemed either over our budget or weren’t very good quality.
On a bike ride this summer we rode passed a yard sale. They had a table that caught our eye. The guy was trying to clean out their house to make room for his “collectables” and only wanted $30 for the table. Without any real plans, we decided we could buy the table, and at the least sell it for $30 again if we changed our mind. We began to look into refinishing furniture and it seemed doable.
This is our first table, we’re definitely not experts, but working on this table was so fun and so inspiring I wanted to share. There is definitely a feeling of empowerment when you can look at a big piece of furniture and know you transformed it. (And it’s even better when you know you saved a whole lot of money doing it!)
First we sanded the top of the table. We used an electric sander for the majority of the top and hand sanded the details on the sides. My husband started with 120 grit sandpaper and then once the previous finish was removed he smoothed the table with 220.

We spent quite a bit of time trying to remove the stain from the legs because our original plan was to use a whitewash stain we found at Home Depot. It required stripper, scraping, sanding, and lots of effort. Once we had the finish removed we applied some wood conditioner and followed it with the whitewash stain. We let the stain sit for a few minutes and wiped it off following the instructions on the can. However, it seemed to pool in the nooks and crannies on the legs. It looked HORRIBLE. I should have taken a picture, but I was so frustrated I wasn’t thinking about it.
I wasn’t planning on jumping on the chalk paint bandwagon, but since the stain didn’t work I decided to give it a try. After all, Pinterest is full of adorable pieces of furniture with comments about how easy it was to paint. I bought a can of Annie Sloan Pure White paint and a can of her clear soft wax. As most other posts will tell you, the paint is expensive. The store I bought it at sold a quart of paint for $34 and a can of soft wax for $24. (I probably only used about 1/4 of each though.)
I painted the legs and rim of the table with two coats of paint. I used a medium sized paint brush and painted in strokes of varying direction to add texture. Once the paint had dried completely I took sandpaper and distressed it. I just sanded around the edges in a few places where I felt distressing would naturally occur.


Next I applied the Annie Sloan clear soft wax to the entire painted area. It was amazing how the wax brought out the color of the wood in the distressed areas. I used a soft cloth to rub the wax on and then after a few minutes I gently rubbed it off with another soft cloth. I repeated this process once a day, three different times. Since it’s a kitchen table I wanted to be sure it was protected.
We bought some cheap white chairs at IKEA and they look pretty good with the table. They aren’t distressed, so I may do that down the road. Here’s the finished product:


It looks great! I’m super impressed and definitely want to see it in person.
Thanks friend! When you’re back and settled we should make that happen. Do you see the awesome wine monkey in the background of the pictures? He makes me smile. 🙂